
How to Deploy Next.js to a Linux VPS Using Nginx and PM2
Next.js is one of the popular JavaScript frameworks for building modern websites and web applications. Built on React, it provides features such as server-side rendering, API routes, and performance optimization. It can be used to build different types of applications, from company websites and dashboards to complex business platforms.
However, after completing an application on your local computer, the next step is making it accessible through the internet. One flexible option is to deploy it to a Linux VPS (Virtual Private Server).
With a VPS, you have greater control over your server, including software installation, security configuration, and application management.
In this tutorial, we will explain how to deploy a Next.js application to a Linux VPS using three main technologies:
-
Next.js: The framework used to run the application.
-
PM2: A process manager that keeps the Node.js application running.
-
Nginx: A web server that receives visitor requests and forwards them to the Next.js application.
This guide uses Ubuntu as the example server operating system. Most steps can also be adapted to other Linux distributions.
1. Understanding the Next.js Deployment Architecture
Before configuring the server, it is important to understand how these three technologies work together.
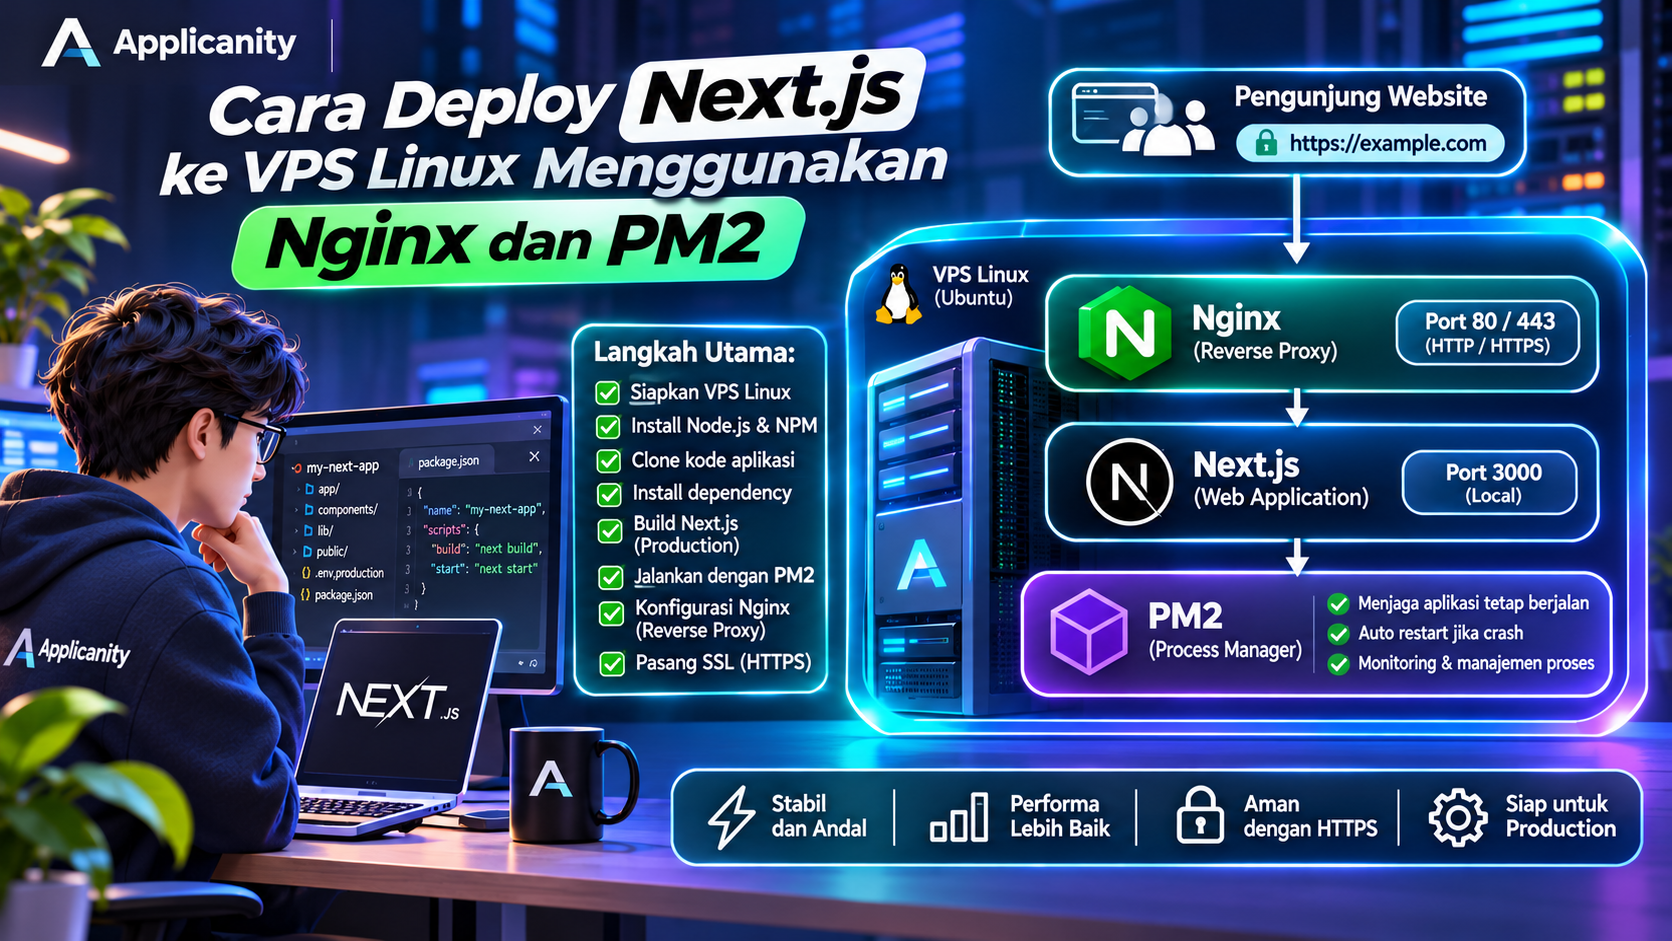
When someone visits your website through a browser, the request is first received by Nginx. Nginx then forwards the request to the Next.js application running on a local port, such as port 3000.
The Next.js application processes the request and sends the response back through Nginx to the visitor.
Meanwhile, PM2 keeps the Next.js application running in the background. If the application crashes, PM2 can restart it according to its configuration.
Here is a simplified architecture:
Website Visitor
       |
       | HTTP / HTTPS
       v
     Nginx
   Port 80/443
       |
       | Reverse Proxy
       v
   Next.js App
   Port 3000
       |
       v
      PM2
(Process Manager)
Each technology has a different responsibility:
| Technology | Purpose |
|---|---|
| Next.js | Runs the website application |
| PM2 | Keeps the application process running |
| Nginx | Receives requests and forwards them to Next.js |
| SSL | Secures communication through HTTPS |
With this configuration, visitors do not need to access port 3000 directly. They only need to visit your website domain through HTTP or HTTPS.
2. Preparing a Linux VPS
Before starting, make sure you have a VPS with SSH access.
The recommended server specifications depend on application size and visitor traffic. For a small application or an initial test, a VPS with 2 vCPUs and 2 GB RAM can be a starting point. Production requirements may be higher.
Make sure you have the following:
-
A VPS running Ubuntu.
-
SSH access through a user with sudo privileges.
-
A domain pointing to your VPS public IP address.
-
Your Next.js application source code.
-
Access to your Git repository if the code is stored on GitHub, GitLab, or a similar service.
For this tutorial, we will use the following example configuration:
| Component | Example |
|---|---|
| Operating system | Ubuntu 24.04 |
| Domain | example.com |
| Application directory | /var/www/my-next-app |
| Next.js port | 3000 |
| Web server | Nginx |
| Process manager | PM2 |
You can change the domain and directory according to your own requirements.
3. Connecting to the VPS Using SSH
Open a terminal on your computer and run:
ssh username@SERVER_IP
For example:
ssh [email protected]
Replace username and SERVER_IP with your actual VPS credentials.
After successfully connecting, update the package list and installed system packages:
sudo apt update
sudo apt upgrade -y
These commands refresh the package list and install available updates.
Next, install several supporting applications:
sudo apt install -y git curl unzip
Their purposes are:
-
git: Retrieves source code from a repository. -
curl: Downloads files or accesses services through URLs. -
unzip: Extracts ZIP archives.
4. Installing Node.js and NPM
Next.js requires Node.js to run the application. NPM is used to manage the packages and libraries required by your project.
A convenient way to install Node.js is through NVM (Node Version Manager). NVM allows you to install and switch between Node.js versions without manually changing the system-wide installation.
Install NVM by following the official installation instructions from the NVM project. Then reopen your terminal or reload your shell configuration.
Once NVM is available, install a Node.js LTS version that is compatible with your Next.js version and project dependencies.
For example, to install Node.js 22:
nvm install 22
nvm use 22
nvm alias default 22
Verify the installation:
node -v
npm -v
If both commands display version numbers, Node.js and NPM are ready to use.
Note: Do not assume that one Node.js version is suitable for every project. Always check the Node.js requirements of your Next.js version and project dependencies.
5. Uploading the Next.js Source Code to the VPS
After installing Node.js, the next step is transferring your application source code to the server.
There are several ways to do this, including Git, SFTP, or uploading a ZIP archive. In this tutorial, we will use Git.
Create an application directory:
sudo mkdir -p /var/www/my-next-app
Change the directory ownership so the current user can manage it:
sudo chown -R $USER:$USER /var/www/my-next-app
Enter the directory:
cd /var/www/my-next-app
Clone your repository:
git clone https://github.com/username/my-next-app.git .
Replace the repository URL with your actual project repository.
If the repository is private, use a secure Git authentication method, such as an SSH deploy key or a restricted-access token. Avoid storing passwords or tokens directly in deployment scripts.
After cloning is complete, check the directory contents:
ls -la
Make sure important files such as package.json, the Next.js configuration, and application source code are available.
6. Installing Application Dependencies
Every Next.js project usually contains a list of dependencies in its package.json file.
To install the dependencies, run:
npm ci
The npm ci command installs dependencies based on the lock file, such as package-lock.json. This is suitable for deployment because it provides a more consistent installation.
If your project does not have a package-lock.json file, you can use:
npm install
Make sure the installation process completes without unresolved errors.
Next, check the scripts section in package.json. A standard production deployment should include at least the build and start scripts.
For example:
{
  "scripts": {
    "dev": "next dev",
    "build": "next build",
    "start": "next start"
  }
}
The scripts have the following purposes:
-
dev: Runs the application in development mode. -
build: Creates a production build. -
start: Runs the application using the production build.
Do not use npm run dev to run a production website. Development mode is intended for development and testing, not for serving real website visitors.
7. Configuring Environment Variables
Many Next.js applications require additional configuration, such as database connections, API keys, secrets, and external service URLs.
These values are commonly stored in environment files.
For example:
DATABASE_URL="mysql://user:password@localhost:3306/my_database"
API_SECRET="your-secret-value"
NEXT_PUBLIC_APP_URL="https://example.com"
Create a .env.production file or another environment file that matches your application configuration.
For example:
nano .env.production
Then enter the required environment variables.
Be careful with variables that use the NEXT_PUBLIC_ prefix. These values can be included in the browser bundle. Never store database passwords, private API keys, or other confidential information using this prefix.
Make sure environment files are not publicly accessible and are not committed to your Git repository.
For example, add the following rules to .gitignore:
.env
.env.*
!.env.example
Review your application environment configuration before building the project. Some environment values, especially those using NEXT_PUBLIC_, are read during the build process and become part of the build output.
8. Building Next.js for Production
After configuring dependencies and environment variables, run:
npm run build
Next.js will process your source code and generate a production version of the application.
If the build is successful, a .next directory will usually be created.
Do not remove this directory because it contains the build output required to run the application.
To make sure the application works, perform a temporary test:
npm run start
By default, Next.js runs on port 3000.
Open another terminal or run:
curl http://127.0.0.1:3000
If the application returns an HTML response, the Next.js server is running.
Stop the test process using Ctrl + C before continuing with the PM2 configuration.
9. Installing PM2
PM2 is a process manager for Node.js applications. Its main purpose is to keep applications running in the background and help restart them when a process crashes.
Install PM2 globally:
npm install -g pm2
Check the installation:
pm2 -v
Next, start the Next.js application using PM2:
pm2 start npm --name "my-next-app" -- start
This command runs the start script from package.json and registers the process under the name my-next-app.
The application now runs in the background, so you do not need to keep a terminal window open.
Check the process list:
pm2 list
View application logs:
pm2 logs my-next-app
Stop the application:
pm2 stop my-next-app
Start it again:
pm2 restart my-next-app
Remove the process from the PM2 list:
pm2 delete my-next-app
Creating a PM2 Configuration Using ecosystem.config.js
To make application management more organized, you can create a PM2 configuration file.
Create the file:
nano ecosystem.config.js
Add the following configuration:
module.exports = {
  apps: [
    {
      name: "my-next-app",
      script: "npm",
      args: "start",
      cwd: "/var/www/my-next-app",
      env: {
        NODE_ENV: "production",
        PORT: 3000,
        HOSTNAME: "127.0.0.1"
      }
    }
  ]
};
Here is what each property means:
-
name: The application name in the PM2 process list. -
script: The program to execute. -
args: Arguments passed to NPM. -
cwd: The application directory. -
NODE_ENV: Indicates that the application runs in production mode. -
PORT: The port used by Next.js. -
HOSTNAME: The local address where the application accepts connections.
Start the configuration:
pm2 start ecosystem.config.js
This configuration makes application management easier, especially if you run multiple Node.js applications on the same VPS.
Automatically Starting PM2 After a Server Reboot
By default, PM2 needs to be configured to restore its processes after a server reboot.
Run:
pm2 startup
PM2 will display an additional command that must be executed with administrator privileges. Copy and run the command provided by PM2.
After that, save the current process list:
pm2 save
PM2 can now restore the saved applications when the VPS starts again.
10. Installing Nginx
After the application is running through PM2, the next step is installing Nginx.
Nginx will receive visitor requests through port 80 or 443 and forward them to the Next.js application on port 3000.
Install Nginx:
sudo apt install nginx -y
Start and enable the service:
sudo systemctl start nginx
sudo systemctl enable nginx
Check the Nginx service status:
sudo systemctl status nginx
If the status shows active (running), Nginx is running successfully.
11. Configuring Nginx as a Reverse Proxy
Now we need to connect Nginx to the Next.js application.
Create a configuration file for your domain:
sudo nano /etc/nginx/sites-available/my-next-app
Add the following configuration:
server {
    listen 80;
    listen [::]:80;

    server_name example.com www.example.com;

    location / {
        proxy_pass http://127.0.0.1:3000;
        proxy_http_version 1.1;

        proxy_set_header Host $host;
        proxy_set_header X-Real-IP $remote_addr;
        proxy_set_header X-Forwarded-For $proxy_add_x_forwarded_for;
        proxy_set_header X-Forwarded-Proto $scheme;

        proxy_set_header Upgrade $http_upgrade;
        proxy_set_header Connection "upgrade";
    }
}
Replace example.com and www.example.com with your actual domain.
Here is an explanation of the main configuration directives:
-
listen 80: Nginx accepts HTTP connections. -
server_name: Defines the domain using this configuration. -
proxy_pass: Forwards requests to the Next.js application. -
proxy_set_header: Passes the original request information to the application. -
UpgradeandConnection: Help forward connections that require an upgrade mechanism, such as WebSocket connections if your application uses them.
Enable the configuration:
sudo ln -s /etc/nginx/sites-available/my-next-app /etc/nginx/sites-enabled/
Test the Nginx configuration:
sudo nginx -t
If there are no errors, reload Nginx:
sudo systemctl reload nginx
Now try accessing your domain through a browser.
If your DNS records point to the VPS IP address and the configuration is correct, your Next.js website should now be accessible through Nginx.
Streaming note: If your application uses streaming responses or features that require data to be delivered gradually, review Nginx buffering settings. For those use cases, consider setting proxy_buffering off inside the location block and test the behavior with your application.
12. Securing the Website with SSL or HTTPS
Production websites should use HTTPS to encrypt communication between browsers and the server.
One easy option is using Let's Encrypt with Certbot.
Install Certbot:
sudo apt install certbot python3-certbot-nginx -y
Run the command to obtain an SSL certificate:
sudo certbot --nginx -d example.com -d www.example.com
Follow the instructions. If the process succeeds, Certbot will help configure SSL in Nginx.
After that, access your website using:
https://example.com
You should also check the certificate renewal process:
sudo certbot renew --dry-run
This command tests whether automatic certificate renewal can work properly.
Make sure your domain points to the VPS and ports 80 and 443 are accessible from the internet before running Certbot.
13. Configuring the VPS Firewall
Make sure your firewall only allows the ports required by your services.
If you are using UFW on Ubuntu, check its status:
sudo ufw status
If the firewall is not enabled, allow SSH connections first to avoid losing access to the server:
sudo ufw allow OpenSSH
Allow HTTP and HTTPS:
sudo ufw allow 'Nginx Full'
Then enable the firewall:
sudo ufw enable
Check the firewall status again:
sudo ufw status
Port 3000 does not need to be publicly accessible because Nginx and the application run on the same server. The Next.js application is configured to accept connections through 127.0.0.1.
Visitors only need to access ports 80 and 443.
14. Updating a Next.js Application After Deployment
Deployment is not a one-time task. Whenever developers make changes to the application, the server also needs to be updated.
Here is a simple workflow for updating an application that is already running.
Enter the application directory:
cd /var/www/my-next-app
Pull the latest changes from the repository:
git pull origin main
Install dependencies if the package list has changed:
npm ci
Build the application again:
npm run build
Restart the application through PM2:
pm2 restart my-next-app --update-env
Check the logs to make sure the application is running normally:
pm2 logs my-next-app
Keep in mind that npm ci reinstalls dependencies based on the lock file. For more complex deployment workflows, consider using separate release directories so the previous application version remains available if deployment fails.
For safer deployments, consider creating automated scripts or using CI/CD tools such as GitHub Actions, GitLab CI, or Jenkins.
15. Troubleshooting: Common Deployment Problems
When deploying an application for the first time, you may encounter several common problems.
A. The Website Shows 502 Bad Gateway
A 502 error usually means Nginx cannot communicate with the Next.js application.
Check the PM2 process list:
pm2 list
View the application logs:
pm2 logs my-next-app
Check whether Next.js is running on port 3000:
curl http://127.0.0.1:3000
If the application is not running, check for build errors, missing environment variables, or incorrect PM2 configuration.
Also make sure the port in the Nginx configuration matches the port used by the application.
B. The Website Cannot Be Accessed
If the website cannot be opened, check the following:
-
Does the domain point to the VPS IP address?
-
Is Nginx running?
-
Are ports 80 and 443 open?
-
Is the firewall blocking the connection?
-
Is the domain configuration in Nginx correct?
Check the Nginx service:
sudo systemctl status nginx
Test the configuration:
sudo nginx -t
C. The Application Stops After a VPS Reboot
If the application does not start after the server reboots, check the PM2 startup configuration.
Run:
pm2 startup
pm2 save
Make sure the startup command provided by PM2 was executed correctly with administrator privileges and the appropriate user account.
D. Next.js Build Errors
If npm run build fails, check the error message displayed in the terminal.
Some common causes include:
-
Incompatible dependencies.
-
An unsupported Node.js version.
-
Missing environment variables.
-
Errors in the application code.
-
Insufficient server memory.
Check the Node.js version:
node -v
If the build requires more memory, consider upgrading the VPS resources or preparing the build in another environment with sufficient capacity.
E. The Website Still Shows the Old Version After an Update
If the application has been updated but the website still displays the old version, check whether the build succeeded and whether PM2 is running the correct application.
Run:
npm run build
pm2 restart my-next-app
If you use additional caching services such as a CDN or another reverse proxy, also check their cache configuration.
16. Security and Server Management Tips
After your application is online, do not assume the job is finished. A production server needs regular maintenance and monitoring.
Here are some recommended practices:
-
Do not run the application as root. Use a dedicated user with only the permissions it needs.
-
Do not expose the application port publicly. If Nginx runs on the same VPS, use a local address such as
127.0.0.1. -
Protect environment variables. Never commit passwords, tokens, or secrets to your repository.
-
Update the system regularly. Install security updates for Ubuntu, Node.js, Next.js, and project dependencies.
-
Monitor application logs. Use
pm2 logsand Nginx logs to investigate problems. -
Create backups. Store database backups, important files, and server configurations in a separate location.
-
Restrict SSH and administrative access. Use strong authentication and only allow necessary access.
-
Monitor resource usage. Regularly check RAM, CPU, disk space, and VPS capacity.
Remember that PM2 is not a replacement for server security and monitoring. PM2 helps manage application processes, while security still depends on proper server administration.
17. Conclusion
Deploying Next.js to a Linux VPS using Nginx and PM2 is a flexible way to run a web application independently.
Each technology has a different responsibility. Next.js runs the application, PM2 keeps the application process active, and Nginx receives visitor requests and forwards them to the application.
With the right configuration, you can run a Next.js application using your own domain, enable HTTPS, manage background processes, and update your application without manually running it through a terminal every time.
For developers who want greater control over their deployment environment, the combination of Next.js, Nginx, and PM2 is worth learning.
However, do not focus only on getting the website online for the first time. Make sure your server also has proper security configuration, regular backups, monitoring, and a reliable deployment process.
This way, your application is not only published successfully but is also better prepared for production use.