

What is WebSocket, and How to Implement It in NodeJS (Part 1 of 3)
Before WebSocket, data communication between client and server relied on HTTP requests, which are one-way. The client sends a request, the server responds, and the connection is closed. This method isn’t suitable for applications that require continuous data updates.
WebSocket solves this problem by allowing bidirectional and persistent communication between the client and the server, enabling data to be exchanged in real time without repeated requests.
What is WebSocket?
WebSocket is a TCP-based communication protocol that allows two-way data exchange over a single, long-lived connection between the client and the server.
Once established, both sides can send messages to each other anytime without initiating new connections. This makes WebSocket much more efficient compared to traditional polling methods.
How WebSocket Works
-
Handshake:
The client initiates an HTTP request asking to upgrade to a WebSocket connection. -
Connection Established:
Once accepted, the connection stays open. -
Data Exchange:
Both client and server can send and receive messages at any time. -
Connection Closed:
The connection remains open until one side closes it or an error occurs.
Benefits of Using WebSocket
-
Real-time communication with minimal delay.
-
Efficient resource usage since only one connection is maintained.
-
Bandwidth-saving, no repeated HTTP headers.
-
Perfect for interactive applications such as chat, dashboards, and online games.
Implementing WebSocket in NodeJS (Basics)
Diagram
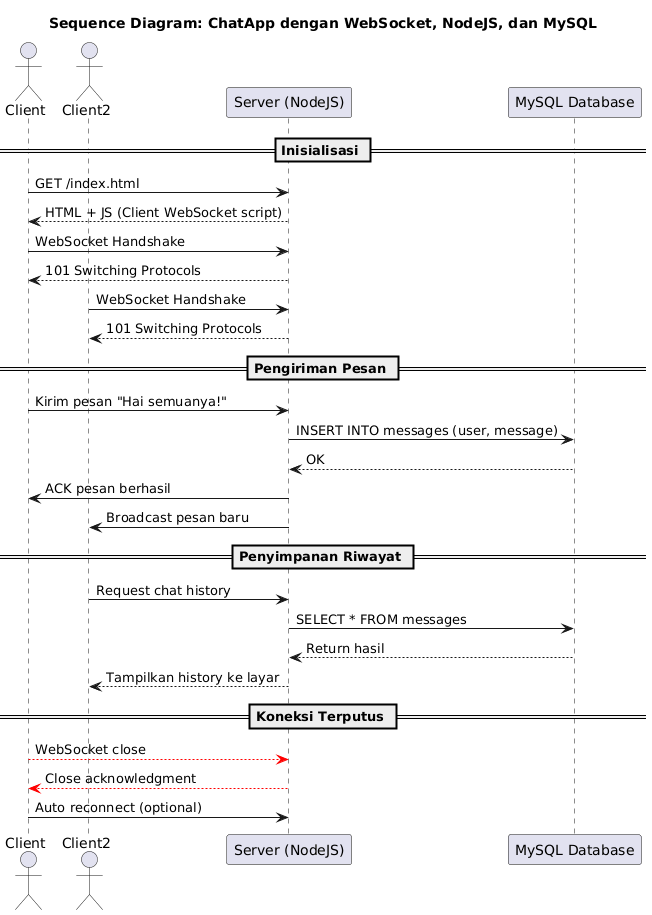
In this first part, we’ll focus on creating a simple WebSocket server using NodeJS.
1. Initial Setup
Ensure NodeJS is installed, then create a project folder:
mkdir websocket-demo
cd websocket-demo
npm init -y
npm install ws
2. Create the Server File
Create a file named server.js:
const WebSocket = require('ws');
const server = new WebSocket.Server({ port: 8080 });

server.on('connection', (socket) => {
  console.log('Client connected');

  socket.on('message', (message) => {
    console.log('Received:', message);
    socket.send('Server received: ' + message);
  });

  socket.on('close', () => {
    console.log('Client disconnected');
  });
});

console.log('WebSocket server running on port 8080');
This code creates a WebSocket server that listens on port 8080 and responds to incoming messages from clients.
3. Test the Server
You can test the connection using a WebSocket client such as browser console or WebSocket King Client.
In the browser console:
const socket = new WebSocket('ws://localhost:8080');
socket.onopen = () => socket.send('Hello from the browser!');
socket.onmessage = (e) => console.log('Message from server:', e.data);
You should see a response from the server if the connection is successful.
Conclusion (Part 1)
In this first part, we’ve learned what WebSocket is and how to create a simple WebSocket server using NodeJS.
In Part 2, we’ll continue with building a WebSocket client and managing multiple client connections simultaneously.